How to Install Shower Doors Sliding: Step-by-Step Guide for Beginners
How to install shower doors sliding is a common question for homeowners looking to upgrade their bathrooms with a modern and functional feature. Shower doors sliding instantly improve style, save space, and enhance usability. This guide will walk you through not just the installation process, but also the key product specifications and everyday uses that make shower doors sliding a smart investment. By the end, you’ll know what to look for in a product, how to set it up properly, and how to maintain it for long-term performance.
Product Specifications of Shower Doors Sliding
Shower doors sliding are designed with both durability and convenience in mind. Before beginning installation, it’s important to know the specifications that affect performance and appearance.
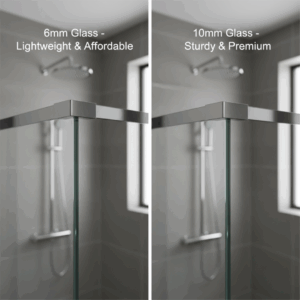
- Glass Thickness: Most shower doors sliding use tempered glass ranging from 6mm to 10mm. A 6mm option is lightweight and affordable, while 8mm or 10mm glass provides sturdiness and a more premium feel.
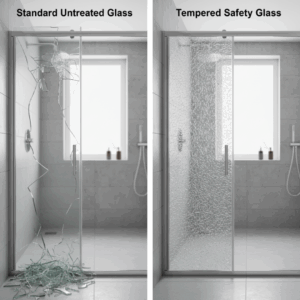
- Glass Type: Tempered safety glass is standard in today’s shower doors. It resists shattering and, if broken, crumbles into small, blunt fragments for added safety.
- Frame Materials: Aluminum and stainless steel are the most common. Aluminum is lightweight, corrosion-resistant, and cost-effective, while stainless steel offers superior strength and long-term durability.

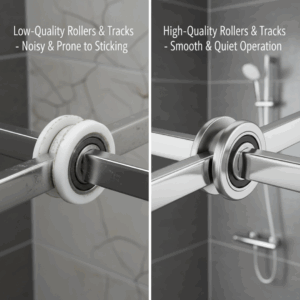
- Rollers and Tracks: Nylon or stainless-steel rollers glide along top and bottom tracks, allowing smooth, quiet operation. High-quality rollers are essential for long-term performance.
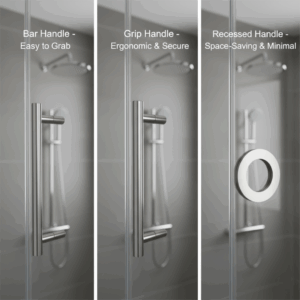
- Handles: Handles come in bar, grip, or recessed styles. A bar handle is easy to grab, while recessed designs save space and keep the look minimal.
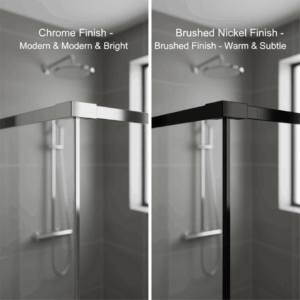
- Finish Options: Shower doors sliding are available in finishes like chrome, brushed nickel, or matte black, allowing you to coordinate with your faucets, towel bars, and other fixtures.
These specifications not only influence the installation process but also determine how the shower doors will perform in daily use.
Practical Uses and Everyday Benefits
Shower doors sliding are not just a style upgrade they offer multiple practical benefits that make them popular in modern bathrooms:
- Space-Saving Design: Since the panels slide instead of swinging outward, they’re ideal for smaller bathrooms or tight layouts.
- Modern Appearance: The sleek look of clear tempered glass framed in metal enhances the overall design of your bathroom.
- User Convenience: Large openings make getting in and out of the shower safe and easy.
- Water Control: Quality seals and tracks help keep water inside the enclosure, reducing the need for extra cleanup.
- Low Maintenance: Semi-frameless or frameless designs reduce areas where dirt and soap can build up, making cleaning easier.
For homeowners, the combination of practicality and elegance makes shower doors sliding one of the most effective bathroom upgrades.
Step-by-Step Installation Guide
1. Measure the Shower Opening
Take accurate height and width measurements of the shower space. Always double-check against the manufacturer’s specifications to ensure your chosen door kit will fit.
2. Prepare the Area
Clean and dry the shower curb and wall surfaces. A smooth, debris-free surface helps the tracks seal tightly.
3. Install the Bottom Track
Position the bottom track on the shower curb. Apply silicone underneath for waterproofing, then screw it securely into place.
4. Attach the Side Rails
Align the vertical side rails with the wall, drill pilot holes, and insert anchors before fastening with screws. These provide structural support for the glass panels.
5. Mount the Top Track
Lock the top track into the side rails, ensuring everything is level. The top track holds the weight of the sliding panels.
6. Hang the Glass Panels
Carefully lift the fixed panel and slide it into the side channel. Next, attach the rollers to the sliding panel and mount it on the top track. Adjust the rollers until the door glides smoothly.
7. Seal the Edges
Apply a continuous bead of silicone along the frame edges to prevent water leakage. Allow 24 hours for the sealant to cure before using the shower.
Product Use and Care Tips
Once installed, shower doors sliding are easy to use and maintain:
- Daily Cleaning: Wipe down glass panels after use to prevent water spots and mineral buildup.
- Track Maintenance: Keep rollers and tracks free of soap scum for smooth sliding.
- Regular Checks: Inspect screws, rollers, and seals occasionally to ensure long-lasting performance.
By following these tips, you’ll maximize both the beauty and lifespan of your shower doors.
Final Thoughts
Learning how to install shower doors sliding not only helps you save on installation costs but also gives you insight into product specifications and everyday benefits. Shower doors sliding provide a sleek, space-saving solution for bathrooms of all sizes. Their durability, ease of use, and low maintenance make them a worthwhile addition to any home. For homeowners who want professional installation or premium bathroom products, Benner Plumbing & Heating Ltd. offers trusted expertise and reliable service to ensure your shower upgrade is both functional and stylish.